Sunday, 31 August 2014

Brake pads

Yeah.

They senior riders with tell you not to stinge on tires and brakes.

I was keen on easily available sbs brake pads but it was $20 a pop.
Not far from the 24 usd ebc hh.
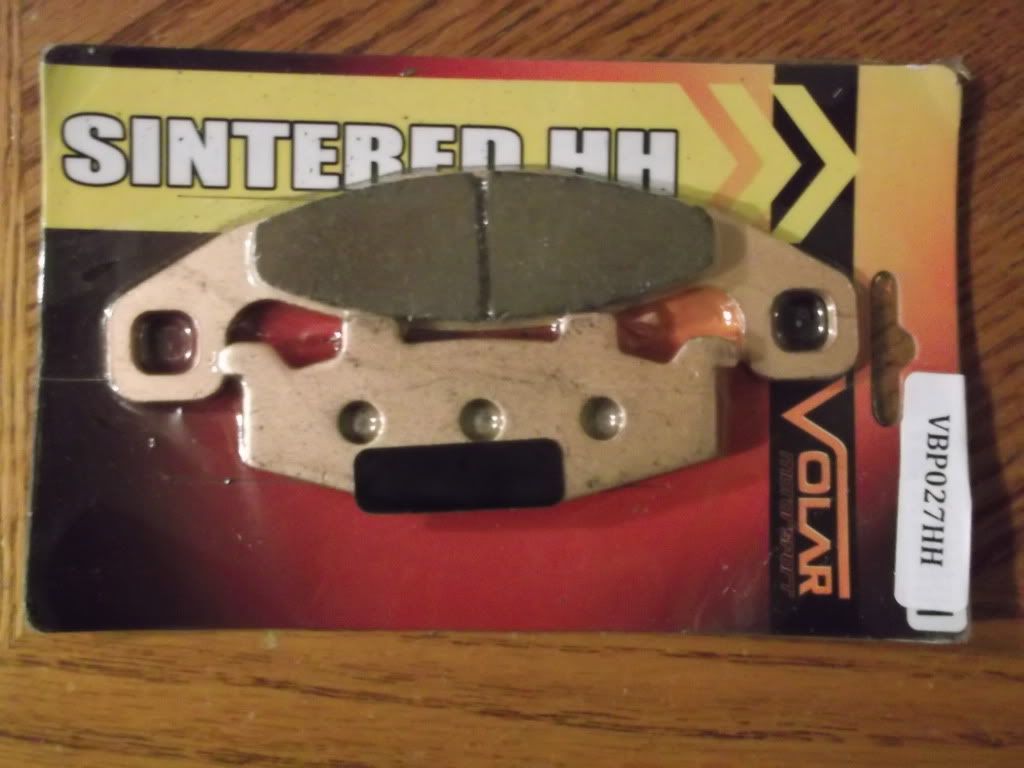
When i saw the good reviews of the volar brake pads from d2moto at $10 a pop I had it debating in my mind.
Have not read a single negative review on them.

Had ordered them from a buddy and I really liked them.


My brakes sucked when I got the bike.
 EBC HH was on my shopping list.

 I got the vesrah green organic kelvar pads because it was that urgent. It didnt make much of a difference.


I got the EBC HH and despite the caliper wash, bleeding and cleaning the brake disc it felt acceptably better but quickly deteoriated over time. Brake dust was alot.

A stainless steel brake line made the world of difference. I had to replace it once because I had improperly routed it. It punctured during a U turn. Dont bother with the expensive branded lines. I got mine from china and it worked just as well. I believe its because it doesnt flex as much and more fluid gets pushed as the line is thinner.

After all the effort, actually, in JB, it cost me only 30rm to service my caliper!
Which made a world of difference!
Ill add this to my yearly to do list!


Nufinish

As a detailer

I am always in search of a better product.
It sucks and it rains too often here.I was doubtful for nufinish but it had too many good reviews to ignore.
Meguiars gold class sucked and turtle wax was too much work.

Well, in short this is a monthly wax.
It beads water like a mofo in that whole duration
Bike is easier to wash
Shine and depth is 8/10 of the turtle wax but it does not attract dust.


EBC PRODUCTS

I always love EBC products.
It started with their top of the range EBC HH brakepads.
In Singapore, traffic is heavy and me being impatient, a quick bite brake pad suited my needs best.
They are costly here for $85 a pair.

So lately i burned my clutch because I attempted climbing gunung brinchang hill with my bike. The stealership wanted $200 without oil(and their crappy oil range). The Oem Distributor wanted $100. I Imported mine for $70.


It was a fairly simple job.
But if you dont have the right tools, you will mess up.
First to come off was the aplenty 8mm bolts after the clutch cable.
From there, You have to use a  27mm straight on wrench to remove the housing basket.
From there, is the screws holding the spring.
There on out, its straight forward but you have to remember that there is one plate that is different.

The 400cc version used 4 instead of 6 springs and 6 instead of 8 plates.

First impression was the bike was more responsive to the throttle.
Finding neutral was difficult but after a day it was fine.

I didnt soak the plates because it was inconvenient.
It might be an old wives tale anyway.
The mechanic felt it wasnt necessary.

Idemitsu

I remembered Idemitsu being in the costly range for cars and was always keen to try it. Since my riding buddy Jes had reccomended it, I tried it. I choosed the semi synthetic version which cost 28 MYR and made in vietnam. The fully synthetic costs 45MYR and made in Singapore.


Jes was right. It was ridiculously smooth.
Starts up cold easier than rotella t6.
Downside?
I could hit 140kph on rotella t6 during my trip to cameron but with this, Max was a disappointing 120kph!

Great oil and I like it.
Just struggles during touring.

My touring fc was 19kph with this oil.

Editors Update 4 october.
I thought oil is oil but this could only bring me 120km/hr
I changed to rotella t6 and immediately could go beyond that.

Leave semi synthetic to small engines and short oil change intervals.

Wednesday, 19 March 2014

Chain lube retry

Okay okay.. Perhaps Ive nailed it this time. To comprehend deeper, lets take a look at the parts of an O-ring chain.


O rings help in lubricating the latches Only. Period.

I love using WD-40 for detailing the chain.

1. Assumption 1. Solvent does not damage the O-rings.
2. Light mineral oil left by the Evaporated wd40 is sufficient.
So the challenges are.
Lubrication between the roller and latch and sprocket teeth

So today, I drip each roller with a drop of gear oil.

Sunday, 16 March 2014

Experimenting with chain lube application

Its a very beaten down subject similar to engine oil.
Lets have a holistic approach to this subject.

O/X ring chains are sealed with grease. So, it is ur job to keep the o-rings supple and the exposed metals from corrosion.
Yes, solvents should be avoided as they might affect the life of the O-rings. But sometimes, its a choice between the "might" and the grinding paste.

An ideal chain lubricant should have these properties
  1. Tackiness (adhesive/cohesive properties) – excellent adhesion to the gears or drive train to be resistant to fling off
  2. Resistance to water washout and spray-off
  3. Load-carrying capability to protect against friction and wear
  4. Protection of the gears against wear and corrosion
  5. Cushioning ability (vibration reduction)
  6. Sprayability and/or ease of dispensability
  7. Alleviation of housekeeping and maintenance problems eg buildup in the roots of the gear teeth
         WD-40 or similar products does a superior job in many aspects except point 1,3 and 5.

         Therefore the other product you use have to be great in the lacking aspects. Also, these  
          aspects is needed only in the rollers, bushings an sideplates meeting the O-ring. In short,           the middle of the chain and not the sideplates.

Its a dirty time consuming back wrenching job.

First step is preparation.
Plain ahead and prepare items.
After coming home from a ride,

1. Soak the chain in a WD-40 or a similar product.
2. Let it sit for a minute or two.
3. Use a rag to detail the chain and gears. Allow solvent to dissipate. 
4. Use a small paint brush with the bristles cut to a length of about an inch. This is to stiffen it up and aiding in precision application.
5. Depending on your conditions, choose a chain lubricant to suit your riding conditions. My favourite is the 80-90w gear oil. Spray that lubricant or gear oil into a small cup. Dip your brush in the solution. Apply a very thin coat onto the rollers and o-rings. A rule of a thumb is to only have to re-dip the brush once and apply only a single coat. 

You are done. If possible, let it sit overnight.

UPDATE(It rusted within a day on the top links. Probably becaused I wiped off the wd40.
ARGH!)


Thursday, 13 March 2014

How to wash a motorcycle vehicle or car

So you come home from a ride and you have fingerprints from your friends touching your bike and dirt starting to appear on your chrome.

If done properly, washing a vehicle regularly helps remove impurities that will cause corrosion.

What is the right way?

Well, there may be many ways to do it but here is how I do mine

Things needed.

1.Shampoo/Wash and Wax

Avoid dish washing liquid looking cheap shampoos.
Dont get the most expensive on the rack too.
If you must go cheap, go for turtle ZIP wash and wax as a benchmark. Cheap and good.

2. A wash mitt


Get the cheap as hell wash mitt with the long things coming out. This helps to prevent scratches. Also, with your hand in, you are able to regulate your strength better and work on difficult corners better as compared to using a sponge.

3. 2 Water buckets and a scoop

20Liters or more

When we talk shampoo pails, liquid goes for a standard mix of 30ml of shampoo and 1Gallon (3.78L) of water. In short, your pail should be about 7L so you have place for the suds.

4. A brush

Go for soft brushes if you have coated wheels or soft plastic surfaces.

5. A chamois

That weird looking bottled cloth helps absorb water efficiently which is one of the most important steps after washing the vehicle.

6. Scapegoat Rag


So lets start.

1. Wash your vehicle only in the early morning or late evening or if you are in a well shaded area. Preferable to have a cool vehicle.(This is to prevent things from drying too fast)

2. Give your vehicle a rinse of water to rid of impurities and cool down the surface. Volume is key.

3. Put on the wash mitt and dip it into the shampoo bucket. Work where you need it to be the cleanest first like the tank, mirror or bonnet. Work fast.

4. Use the scapegoat rag to wash dirtier places like rims, lower fairings(use a soft rag) and near your drive train or swing arm. Work fast.

5. Give your vehicle a rinse and allow water for  flow down instead of splashing. Volume is key.

6. Wipe dry with the chamois. Skipping this step will give you water spots all over your vehicle.

Cheers and bling.