Saturday 8 November 2014

Iridium VS Normal nickle/copper plugs

And so I thought I'd save much time working on the plugs if I had to change them every 12 000km. Besides, i wont have to be spending any more money on trying to get the honda specific plug tool.

Iridiums were kinda cool in the 1000 mile trip I took, perhaps one of the main reasons for the shocking performance. Starting up was also a breeze. Something I wasnt able to replicate again.

Here, on the left are the Iridiums I got, They cost about 4-5 x your normal plugs


Well they were supposed to last 50 000km. At 14 000km, they started misfiring. When removed, they had some build up around the iridium tip, oil after the gaskets. Well, I had them replaced and they started just right. They were really cheap too.

I would have gone with the denso's the next time around.
Maybe their U groove techonology works?


 Plugs were showing that I was running lean.. So i decided to richen it a little.
Wow, engine runs much cooler now.

Tuesday 28 October 2014

Coolant horrow

4 months ago, I decided to get a "real coolant" and get

Prestone AF2100 Extended Life 50/50 Antifreeze from amazon. $10usd for a gallon, from my trusty amazon and it says its a 5 year coolant. What could go wrong right?


4 months ago, I decided to open up the reservoir cover. To my horrow, i saw this.

Mud in my reservoir? Googling that pointed me to a direction of a head gasket leak( oil and coolant cross contamination) Those few months were easy miles. So I googled prestone and long life coolant. To my horrow yet again, dexcool is known to cause non chemical removable sludge. Some say if its exposed to air or mixed with another coolant, this will happen. I googled prestone dexcool and it seemed that this yellow bottle probabbly is dexcool.

I did a vinegar flush(which i still think is a waste of time doing it for the 2nd time)
Did a 40L tap water flush.
Filled her up with the normal green coolant.

Damn it.

Tuesday 7 October 2014

Gravity fed oiler


Here is my simple gravity fed oiler. Im not willing to pay $200 for a set of ready made scott oiler.
Adding vales and sorts will just add to premature failure of the system and leaks.

How it works?
When I squeeze the bottle, the oil flows down the tube, but i stop when it is 3/4 down the hose. Upon release, Excess will be sucked back in to the reservoir and the remainder will drip onto the inner run of the chain. In this system, it drips really fast as there is nothing to resist the flow.

You will get flings but ive learn to deal with it.
Also, you will have to clean the chain at least once every 2-3weeks.

Editors tip,
Use 85-90w gear oil only as it maintains the best balance between cleanliness and protection.
Drip must land on the inner run of the chain to avoid flings.

Thursday 18 September 2014

Ferrite Cores

My riding buddies went crazy over the 9power ferrite.
Note that these are scientists, senior managers, teachers and IT experts. Raves are improve throttle response. $15 a piece and fits over your spark plug wire.

The beads

The mechanic said that cheaper versions can be found at IT stores. So I went and got them for $3 a piece. Went crazy and got myself two pieces a wire. Mounted it on and yes. The difference is that there is a significantly lesser vibrations from the firing of the plugs.

You probabbly seen this on your monitor screens, laptop chargers and television.
The simple explanation is that this prevents interruption of signals. In details, it suppresses EMI and RFI.


Initially, I thought maybe new plug wires cant be that bad. I tried to ignore but I could really feel the thumping of the Vtwin.
A day after, I mounted one instead of two on my newly done up spark plug wire kit and voila, it works.
 This time around, instead of installing it right after the the spark plug cap, I installed it with similar fashion as of other products, about two inches away.

Editors Tip: Althought it serves as a clip on, it bites into the plug wires which may cause leaks and unintended grounding. So what I did was to remove the cores and cable tie them to the wires.
Ebay have them selling dirt cheap.
Note that my wires are 7mm in diameter. These beads comes in different sizes.

Spark plug wire replacement tutorial

Hello, today i will be writing a tutorial on replacing the caps and wires of a spark plug cable on my honda shadow vt750c ace 1998 equivalent .

Please take note that I am not a professional mechanic but a hobbyist.

So first lets take a look on replacing your particular spark plug wire.

Note that two of our wires are using


Oem  = SD05F x 2 , SD05FGA

I ordered part number SD05FP x 4 thinking I would get better water protection.

Its hard to see due to the non focal camera but the part number is written on the oem plug.
Looks like it was made from NGK.


 Oem and the new plug cover. The difference is a sealing lip. 
Well honestly, both plugs are rated waterproof.

Next up is choosing wires. 
OEM wires are copper wires which are tin plated.
Why tin plated? It is more durable in many many ways.
We are using 7mm spark plug wires. I ordered 2M and it was rather just nice with about 10cm of leftover.
To find your length needed for other bikes,  You can use partzilla.com.

Again difficult to see but OEm wires are made out of about 8 solid strands of tin coated copper wires. The new wires are copper only and made out of 24 thin ones. To give an idea, a scissors off a workdesk would require some effort to give the oem a snip.

I got my wires off ebay from timgreen80.

If I had a re go, I would have bought these water deflectors pre installed. The oem spark plug wires heat shrink was so etched on that you really have to work on it with a plier and scissors. Took me about <10 mins to have it cleanly removed so the 7mm wire can go through it.


Installing the plug cap to the wire just requires you to thread it on. Its like a sharp nail inside of the plug. You twist the wire on it until u reached the bottom. To attach it to the ignition coil, inside is just a blunt nipple and it just requires contact.


 Notice the cap that screws onto the ignition module.


 Comparing with the oem wires.


Finished effect.
Enjoy.


Editors note : I replaced the wires for cosmetic reason and I get occasional electrical shock when my thigh touches the wires.
After replacing these, Bike was a little more responsive.
I wouldnt reccomend replacing them if yours are working fine.
OEM : $240
Racing wires from NGK : $120 from distributor $240 from shop.
My diy $40 SGD

What are the cable tied magnet looking things on the plug wires?
Ferrite Cores which were inventually transferred to the new wires because there was an obvious difference without them. These will be covered in another post.

Saturday 13 September 2014

Action Camera

At first it was a digital camera on a mount. Bulky.. took time to get the right angle.

Next was the MD80. Blurry, cheap, did its job but mounting was a challenge. Being so small I often forgot to take it off after parking..

Dad wanted to sponsor so it was between a $260 amazon set go pro white or a $320 local set.
Until i read from techmoan that he strongly reccomended a SJ4000. Its an excellent Go pro replica but lacks only the extreme capabilities..


You can use the same mounts. It is priced at 90USD. What got me interested was the  insurance and warranty but a bummer it was only for usa and canada.
Note that there are many fakes in the market.

So techmoan had it reviewed. A set was given to him by foxsales1 from hongfeng.  I wanted to support them but it Thats $113. WITH NO WARRANTY.

So I could get some random one from taobao at $80sgd.

Okay 113! Because sellers from ebay cares about customer service!

Review of progressive suspension

Hello and thank you for reading

Today Ill be reviewing the progressive suspension for my honda shadow ace 1998 400cc

Front

11-1126 with 10w torco fork oil

Rear

412-4207c
12.5Inch

Rider weight
92kg

Pillion Weight
45kg

Review

Stock suspension.

Reason I did the change was because on patched roads, it was a nightmare and the sudden bottoming out scared my pillion. The front dive was crazy and coming out from humps was killing my back.

Front progressives with stock rear.

Great enough for Commuting in singapore at setting number 2.
In johor, it was terrible riding 2 up on setting number 3. Especially on patched road and small drops it would bottom up.

Front progressives with 11.5 inch HD.

Well, I took at 1500km Trip and loved it.
It was a little stiff but did the job to be predictable and stable.
However after  trying out the too soft 12.5 sporster progressive on my bike, i felt that there could be better out there. Something softer than the HD would be great. Also, needed something higher as steering the bike now takes more effort. I felt that 1 inch drop didnt make any difference in looks but yet it took away the ride ability of the motorcycle. With my legs up higher, i felt it was tiring as i have no support of my thighs with the seat.

Now with the complete set of the progressives, I feel that the bike rides like a dream on setting number 2. 3 at 2 up was a little too stiff thought the height was comforting.
I have had one bottom out which was extremely minor.

My friend had a leak with his valkyrie. I read that they advised to lube the shaft.


Friday 12 September 2014

Project on air box snorkle

Well. Bike was struggling to go above 120 since the oil change.
Was waiting on the fumoto before i get that drained out.
So i read online and the raves on how much better the bike sounded with the snorkle removed. So Since it was a reversible modification I went ahead.

I sprayed the damn uni filter with WD40 equivalent and that shit started swelling up the foam. Dammit I had to dip her in a pail of water and washed her out with detergent. Thank god it was still alright. Have to get that $10 can of PJ1 at chong aik. $20 is just too damn steep for a maxima. Realising the wall of the air filter was filled with oil and dirt, I decided to lightly towel dry the filter oil before putting her on. Perhaps next time ill stick a double sided tape in to see if she is filtering fine.

Rode that way for two days. Bike sounded like a turbo charged  vehicle sucking in for air. Really cool but performance was really really bad. It felt like no gas after 80km/hr. Even pick up was slower. Since I had the snorkle with me, I decided to clean her up. Damn the amount of road tar with 200 000km was ridiculous. Had her back on the she sounded a little different. Like it had a mini turbo. You can feel the vibration from the air box. Felt abit paranoid it could be my exhaust. I guess its from removing some kinda flap which increases intake noise.

My last top up gave me 21km/L.
Not bad at all.

Saturday 6 September 2014

Uni air filter servicing and removing air box snorkle

Been awhile since Ive serviced my Uni air filter. 1/2 Year seemed like a good idea but my mileage was starting to suffer.
Wanted to buy a specific cleaner but it was out of stock.

So I used a WD40 equivalent and 5 seconds after application, the foam started swelling. To avoid further damage, I Immediately dipped the foam into a bucket of water and followed by a detergent wash.

It wasnt really effective but im sure it was cleaner than before it went into the bucket. I towel dry it and left it by the window. By next morning, it was dry and I applied PJ1 Foam air filter oil. Previously, I oiled till the black foam turned red. This cause the air box to be coated with a layer of this oil. This time around, i made sure every inch was coated lightly then i used a rag  to remove as much as I could of the oil. After which, to the touch, the air filter was still tacky. I read about removing the snorkle from the air filter and I tried doing it. It sounded like a turbo charger especially when it was sucking in air. Apparently that excitement was short lived the moment it hit the streets. It as only responding to very low revs. After which, it felt like it was choking. Im not keen or rejetting or adjusting any air fuel ratio mix so I put it back on. I cleaned the snorkel comprehensively. The amount of road tar was crazy!

When putting it back, I realised that with a cleaner filter, the exhaust was sounding much better. Ive yet to fill the tank to determine mileage increase but i realise that I could feel the heat of the engine between my legs. Something which I have not felt in a while. I think it might be because it is running slightly leaner.


I was keen on a filter skin but the design of the ace is such that it filters air from the inside out of the filter! I read that some riders use panty hose as a prefilter. I kinda like that idea. I might be doing that next time.

Sunday 31 August 2014

Brake pads

Yeah.

They senior riders with tell you not to stinge on tires and brakes.

I was keen on easily available sbs brake pads but it was $20 a pop.
Not far from the 24 usd ebc hh.
When i saw the good reviews of the volar brake pads from d2moto at $10 a pop I had it debating in my mind.
Have not read a single negative review on them.

Had ordered them from a buddy and I really liked them.


My brakes sucked when I got the bike.
 EBC HH was on my shopping list.

 I got the vesrah green organic kelvar pads because it was that urgent. It didnt make much of a difference.


I got the EBC HH and despite the caliper wash, bleeding and cleaning the brake disc it felt acceptably better but quickly deteoriated over time. Brake dust was alot.

A stainless steel brake line made the world of difference. I had to replace it once because I had improperly routed it. It punctured during a U turn. Dont bother with the expensive branded lines. I got mine from china and it worked just as well. I believe its because it doesnt flex as much and more fluid gets pushed as the line is thinner.

After all the effort, actually, in JB, it cost me only 30rm to service my caliper!
Which made a world of difference!
Ill add this to my yearly to do list!


Nufinish

As a detailer

I am always in search of a better product.
It sucks and it rains too often here.I was doubtful for nufinish but it had too many good reviews to ignore.
Meguiars gold class sucked and turtle wax was too much work.

Well, in short this is a monthly wax.
It beads water like a mofo in that whole duration
Bike is easier to wash
Shine and depth is 8/10 of the turtle wax but it does not attract dust.


EBC PRODUCTS

I always love EBC products.
It started with their top of the range EBC HH brakepads.
In Singapore, traffic is heavy and me being impatient, a quick bite brake pad suited my needs best.
They are costly here for $85 a pair.

So lately i burned my clutch because I attempted climbing gunung brinchang hill with my bike. The stealership wanted $200 without oil(and their crappy oil range). The Oem Distributor wanted $100. I Imported mine for $70.


It was a fairly simple job.
But if you dont have the right tools, you will mess up.
First to come off was the aplenty 8mm bolts after the clutch cable.
From there, You have to use a  27mm straight on wrench to remove the housing basket.
From there, is the screws holding the spring.
There on out, its straight forward but you have to remember that there is one plate that is different.

The 400cc version used 4 instead of 6 springs and 6 instead of 8 plates.

First impression was the bike was more responsive to the throttle.
Finding neutral was difficult but after a day it was fine.

I didnt soak the plates because it was inconvenient.
It might be an old wives tale anyway.
The mechanic felt it wasnt necessary.

Idemitsu

I remembered Idemitsu being in the costly range for cars and was always keen to try it. Since my riding buddy Jes had reccomended it, I tried it. I choosed the semi synthetic version which cost 28 MYR and made in vietnam. The fully synthetic costs 45MYR and made in Singapore.


Jes was right. It was ridiculously smooth.
Starts up cold easier than rotella t6.
Downside?
I could hit 140kph on rotella t6 during my trip to cameron but with this, Max was a disappointing 120kph!

Great oil and I like it.
Just struggles during touring.

My touring fc was 19kph with this oil.

Editors Update 4 october.
I thought oil is oil but this could only bring me 120km/hr
I changed to rotella t6 and immediately could go beyond that.

Leave semi synthetic to small engines and short oil change intervals.

Wednesday 19 March 2014

Chain lube retry

Okay okay.. Perhaps Ive nailed it this time. To comprehend deeper, lets take a look at the parts of an O-ring chain.


O rings help in lubricating the latches Only. Period.

I love using WD-40 for detailing the chain.

1. Assumption 1. Solvent does not damage the O-rings.
2. Light mineral oil left by the Evaporated wd40 is sufficient.
So the challenges are.
Lubrication between the roller and latch and sprocket teeth

So today, I drip each roller with a drop of gear oil.

Sunday 16 March 2014

Experimenting with chain lube application

Its a very beaten down subject similar to engine oil.
Lets have a holistic approach to this subject.

O/X ring chains are sealed with grease. So, it is ur job to keep the o-rings supple and the exposed metals from corrosion.
Yes, solvents should be avoided as they might affect the life of the O-rings. But sometimes, its a choice between the "might" and the grinding paste.

An ideal chain lubricant should have these properties
  1. Tackiness (adhesive/cohesive properties) – excellent adhesion to the gears or drive train to be resistant to fling off
  2. Resistance to water washout and spray-off
  3. Load-carrying capability to protect against friction and wear
  4. Protection of the gears against wear and corrosion
  5. Cushioning ability (vibration reduction)
  6. Sprayability and/or ease of dispensability
  7. Alleviation of housekeeping and maintenance problems eg buildup in the roots of the gear teeth
         WD-40 or similar products does a superior job in many aspects except point 1,3 and 5.

         Therefore the other product you use have to be great in the lacking aspects. Also, these  
          aspects is needed only in the rollers, bushings an sideplates meeting the O-ring. In short,           the middle of the chain and not the sideplates.

Its a dirty time consuming back wrenching job.

First step is preparation.
Plain ahead and prepare items.
After coming home from a ride,

1. Soak the chain in a WD-40 or a similar product.
2. Let it sit for a minute or two.
3. Use a rag to detail the chain and gears. Allow solvent to dissipate. 
4. Use a small paint brush with the bristles cut to a length of about an inch. This is to stiffen it up and aiding in precision application.
5. Depending on your conditions, choose a chain lubricant to suit your riding conditions. My favourite is the 80-90w gear oil. Spray that lubricant or gear oil into a small cup. Dip your brush in the solution. Apply a very thin coat onto the rollers and o-rings. A rule of a thumb is to only have to re-dip the brush once and apply only a single coat. 

You are done. If possible, let it sit overnight.

UPDATE(It rusted within a day on the top links. Probably becaused I wiped off the wd40.
ARGH!)


Thursday 13 March 2014

How to wash a motorcycle vehicle or car

So you come home from a ride and you have fingerprints from your friends touching your bike and dirt starting to appear on your chrome.

If done properly, washing a vehicle regularly helps remove impurities that will cause corrosion.

What is the right way?

Well, there may be many ways to do it but here is how I do mine

Things needed.

1.Shampoo/Wash and Wax

Avoid dish washing liquid looking cheap shampoos.
Dont get the most expensive on the rack too.
If you must go cheap, go for turtle ZIP wash and wax as a benchmark. Cheap and good.

2. A wash mitt


Get the cheap as hell wash mitt with the long things coming out. This helps to prevent scratches. Also, with your hand in, you are able to regulate your strength better and work on difficult corners better as compared to using a sponge.

3. 2 Water buckets and a scoop

20Liters or more

When we talk shampoo pails, liquid goes for a standard mix of 30ml of shampoo and 1Gallon (3.78L) of water. In short, your pail should be about 7L so you have place for the suds.

4. A brush

Go for soft brushes if you have coated wheels or soft plastic surfaces.

5. A chamois

That weird looking bottled cloth helps absorb water efficiently which is one of the most important steps after washing the vehicle.

6. Scapegoat Rag


So lets start.

1. Wash your vehicle only in the early morning or late evening or if you are in a well shaded area. Preferable to have a cool vehicle.(This is to prevent things from drying too fast)

2. Give your vehicle a rinse of water to rid of impurities and cool down the surface. Volume is key.

3. Put on the wash mitt and dip it into the shampoo bucket. Work where you need it to be the cleanest first like the tank, mirror or bonnet. Work fast.

4. Use the scapegoat rag to wash dirtier places like rims, lower fairings(use a soft rag) and near your drive train or swing arm. Work fast.

5. Give your vehicle a rinse and allow water for  flow down instead of splashing. Volume is key.

6. Wipe dry with the chamois. Skipping this step will give you water spots all over your vehicle.

Cheers and bling.


Detailing

Well, gone were the days when I used detergent powder to wash my bike.

I have used Armorall wash and wax(BLUE), Turtle Zip Wax Liquid Wash , Zip Wash and glow and lastly, Meguiars wash and wax and Meguiars Gold Class.

Well its a rather surprisingly short list because previously, I ventured into using glare and aerosol type products to achieve my finishes. Lately, I find that it is more fulfilling to just wash the bike... the right way only takes 10 minutes the most and it is more eco friendly.

Well here is my verdict

Outstanding : Turtle Zip Wax Liquid Wash, Armorall wash and wax

Normal : Meguiars Wash and wax, Meguiars Gold class and Zip wash

Meguiars


Well Meguiars Wash and wax and meguiars Gold class had all the raves. Priced at $37 SGD, I got it at a clearance sale where I jumped on it I believe it went for $13??

Although I appreciate the specific products Meguiars had come out with, I felt that I was left disappointed everytime. They seem to be pushing the multi-step process which is not only time and money consuming for a show room finish that would not last 2 days on my chrome and black paint parked out in the sun and ride on dusty and rainy weather in short, the everyday rider.

There were suds and they had the nicest of smell but they just did a so-so job in washing the vehicle.

Turtle Zip Wax Liquid wash


Awesome.
So I passed my gas station and this small 16oz bottle was going for $3.20.
I expected a single coloured like liquid but out came a pleasant citrus smelling and an visual obvious mix of shampoo and wax. The lathering is fantastic and leaves a fantastic sheeting action upon the final rinse. Its PH friendly and gentle. It nourishes the current wax on your paint. I looooveeee this..
Didnt gave a second thought on ordering when I saw a 2000ML bottle going for about $5usd online.
This would be my staple for a while.
Alike the meguiars, this product is biodegradable.

I dont understand why people slam turtle wax brand. I am a big supporter of their products because they make quality detailing affordable. They have been around forever. They must be doing something right.
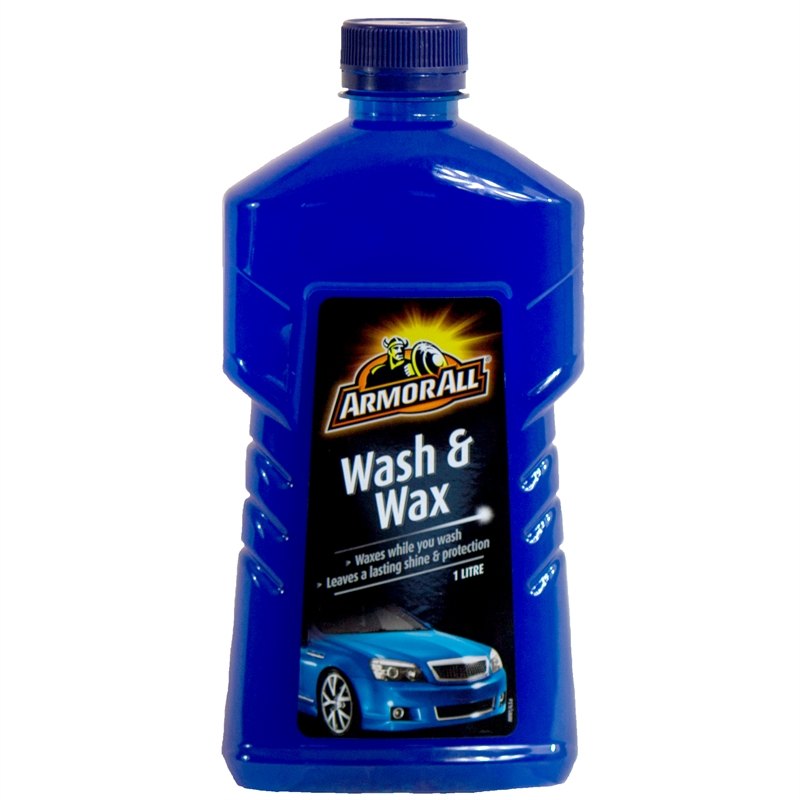
Armorall

I had this bottle lying around for 3 years.
Im happy I had it around because I could compare with my new stocks.
This must be one of my favourite washes. I got it for $9.
I believe it is mild alkali wash that is an effective cleaner. It leaves a protecting film.
It leaves your paint squeaky clean.
Therefore.. Its so squeaky it will make your windscreen wipers hop instead of sliding! Cages might wanna avoid.
I read the Car wash alone worked well for some people. They are the same price by the way.

They have the ultra shine series which I have yet to try.

Zip Ultra Glow

Bought it for $2 a liter.
Not worth writing a review.
Will still use it when broke.

Editors note Oct 2014

Round and round trying different brands EVERY wash. Ive concluded the ultimate best Ive used is Zip wash from turtle wax. Shines the vehicle well and keeps it that way longer.

Saturday 8 March 2014

In search of the perfect Chain lube

Im annoyed to the fact that finding the "ideal chain lube" for motorcycles are such a daunting task.
Orings are internally lubricated but you will have to keep the chain plates from rusting and the external O-rings supple.

What are we expecting?

A clean chain.
A non sticky lube that attracts sand.
A non wax lube because it accumulates crap at the front sprocket and is difficult to remove.

Here are my reviews for the ones ive ran through

Gear Oil(Transmission fluid)


Believe it or not, this is what the manual calls for.
This is great stuff but like high end chain lube, it attracts dust(not sand)
A tip is to leave it on the chain over night and it will hardly fling the next morning.
Or.. use a non absorbent cloth to wipe off the excess after use.

Elf moto chain lube


Pure crap that flings and black in colour.

Maxima chain wax


I actually really like this. Just dont over spray it.
Has a nice smell and keeps the chain clean.
However.. It does not lubricate the rollers well. 
The lube is hard to clean off too.

Dupont Chain Saver

Behold!! This was well liked by many.
Dupont has a great reputation.
These are one of my favourite actually.
Goes on dry and clean to use.
However, it attracts dust really fast!
I would love to try out their multi-use lubricant.

Plain OLD WD-40

Call me crazy but it was interesting that many had success by using it without any lube.  I just had to try it.

In short, Its perfect in many ways. Cleans a warm chain like a dream. Chain looks the best ever.
Chain gets smooth. Self cleaning.
However... Its lubricating properties are rather "light". Which results in a noisy running chain.

No, it does not ruin the O-Rings(only possible with prolonged soaking and not possible by spraying)

It is not a kerosene!

The drawback I could think of is that sprockets get worn due to the lack of film strength. And it has to be applied more often.


Thats about all folks!
Im still experimenting!


Degreaser(Think WD-40)

Oh yea time for a new WD-40 Spray.
Here are my reviews
I have some kerosene left but they are not really friendly to work with and they stink.
It bothers my cat when I want to cuddle with him

Went to a mall and selected a few to compare

WD-40 - 400ML at $8
The Benchmark in such products
3 different sizes.
Found it rather pricey to be priced close to Gt-85

GT-85 - $10 for 400ML
This will probably be the best due to it containing teflon but it was too expensive.
Might inter fear with chain lubes

Plain oil Kerosene $3 for 500ml
This stinks.

Loozen (didnt check price)
No brand recognition but seen it being used at a motorcycle workshops.
Also, printing seems like they were a WD-40 wannabe.
They failed and it looks bad

3M 400ML $6-7
No doubt it would be a trusted product but its spray was indifferent. It was like OFF mosquito repellent spray so i question the spray ability to pinpoint a chain and reduce overspray.

Selleys
about $6 for 350ml

Double-TT

$4 for 400 ML and made in the UK
Took effort in the design and I loved the straw holder(We all know how often we loose them)

Went for the Double TT!!

Tuesday 11 February 2014

12 Feb 2014

What a great day today.

Started out with cooking for my oh so wonderful girlfriend and she decided to accompany me for gear shopping at Hodaka Motorworld. Needed a new glove but reluctant to fork out $80 for one. So we went to Motorsports Asia right opposite them. We were eyeing a light brown axon jacket with a hefty price tag. We asked about it because it was no longer on display and after which, the salesperson dug up new stocks and voila! A single piece in my size fresh from shipment. We jumped at it. I felt really happy about it. Nothing cheers me up more than getting gears after knowing the importance of them since the horrific accident.

It was really hot so I decided only to wear it when I was hitting the highway. I had wanted to help a buddy fixed up his wrecked bike but since it was still early, I decided to head to johor to service my bike. Well the story goes that I have been doing some forum reading and come to the conclusion that people change their oil from 2000miles to 10 000miles. I believe at the end of the day is what you believe in. Checking my dipstick, it showed a really dark oil. Its been 4000km, 4 months, ridden daily in the harshest of conditions on 2000ml of oil. I decided it was time. Well, I know colour might have little to do with its capabilities but come on.. From golden honey to a dark pungent foamy black sooty coloured oil... Something just seems different and the bike started to feel... stale. 

To cut the story short, I changed my platinum plugs to copper plugs and she started to be more responsive. She sounded thumpier! She felt fresh off the lights.

The 2t mix of 2ml / L worked right but however, the spark plugs had rather a build up of soft wet carbon. I might reduce the mixture to 1.5ml/L and see how she fares.

I am using rotella t6 and I love it at 5us/L. But I was considering using idemitsu mineral oil for future changes at 18rm/L